


Excel is a popular tool for creating timesheets. Below, we show you how to do this and share a simpler, faster, and more accurate alternative.
Companies often use Excel to build timesheets. While it’s cost-effective, it’s also manual, time-consuming, and prone to errors.
In this guide, we explain how to create a timesheet in Excel, provide a free template to save you time, and discuss a much better way to track hours for your team.
Key Takeaways
- Excel is a cost-effective way to create and review employee timesheets.
- You can create timesheet templates in Excel by adding basic headers and timesheet labels and using specific formatting and formulas for calculations.
- While Excel is widely used, it takes a lot of time, leads to mistakes, and isn’t a scalable timesheet management solution.
- Many companies are switching to affordable time tracking software like Connecteam, which automates the process and improves accuracy.
What Is a Timesheet?
A timesheet records the time an employee spends working on their tasks, projects, or jobs. It typically includes workers’ personal details, start and end times, rest breaks, lunch breaks, and total hours worked each day.
Traditionally, timesheets were created manually using paper-based time cards on which workers logged their hours. Today, most companies use digital time tracking methods, such as spreadsheets or specialized software.
Timesheets can be created for any specific period. The most common ones are:
- Daily for short-term projects or ad-hoc tasks.
- Weekly to summarize hours worked over a week—most popular for project-based work.
- Monthly, which aggregates data over a month and is better suited for payroll cycles or long-term projects.
This Might Interest You
Looking to use Excel for tracking employees’ time off and vacations? Read our guide about how to create a time off tracker in Excel.
What Is a Timesheet Used For?
A timesheet is a useful tool for both employers and employees. It tracks how long employees spend on various tasks and projects, helping to boost productivity, manage resources, and process payroll.
Let’s break this down:
- Monitoring productivity: Employers can check how staff members spend their work hours on tasks, clients, and projects.
- Project management: You’ll be able to track how hours are split across projects and clients. This can aid in project planning and resource allocation.
- Compliance: You can also ensure you’re sticking to local laws around meal times, break times, and overtime hours.
- Budget management: Timesheets can show you your labor costs across projects and jobs. This way, you can stay on top of your budget and control costs such as overtime expenses.
- Payroll and billing: By keeping a careful log of total hours worked, you can ensure employees are paid fairly for their contributions. You can also accurately invoice clients for billable hours.
How To Create A Timesheet In Excel
Follow these simple steps to create a timesheet in Excel.
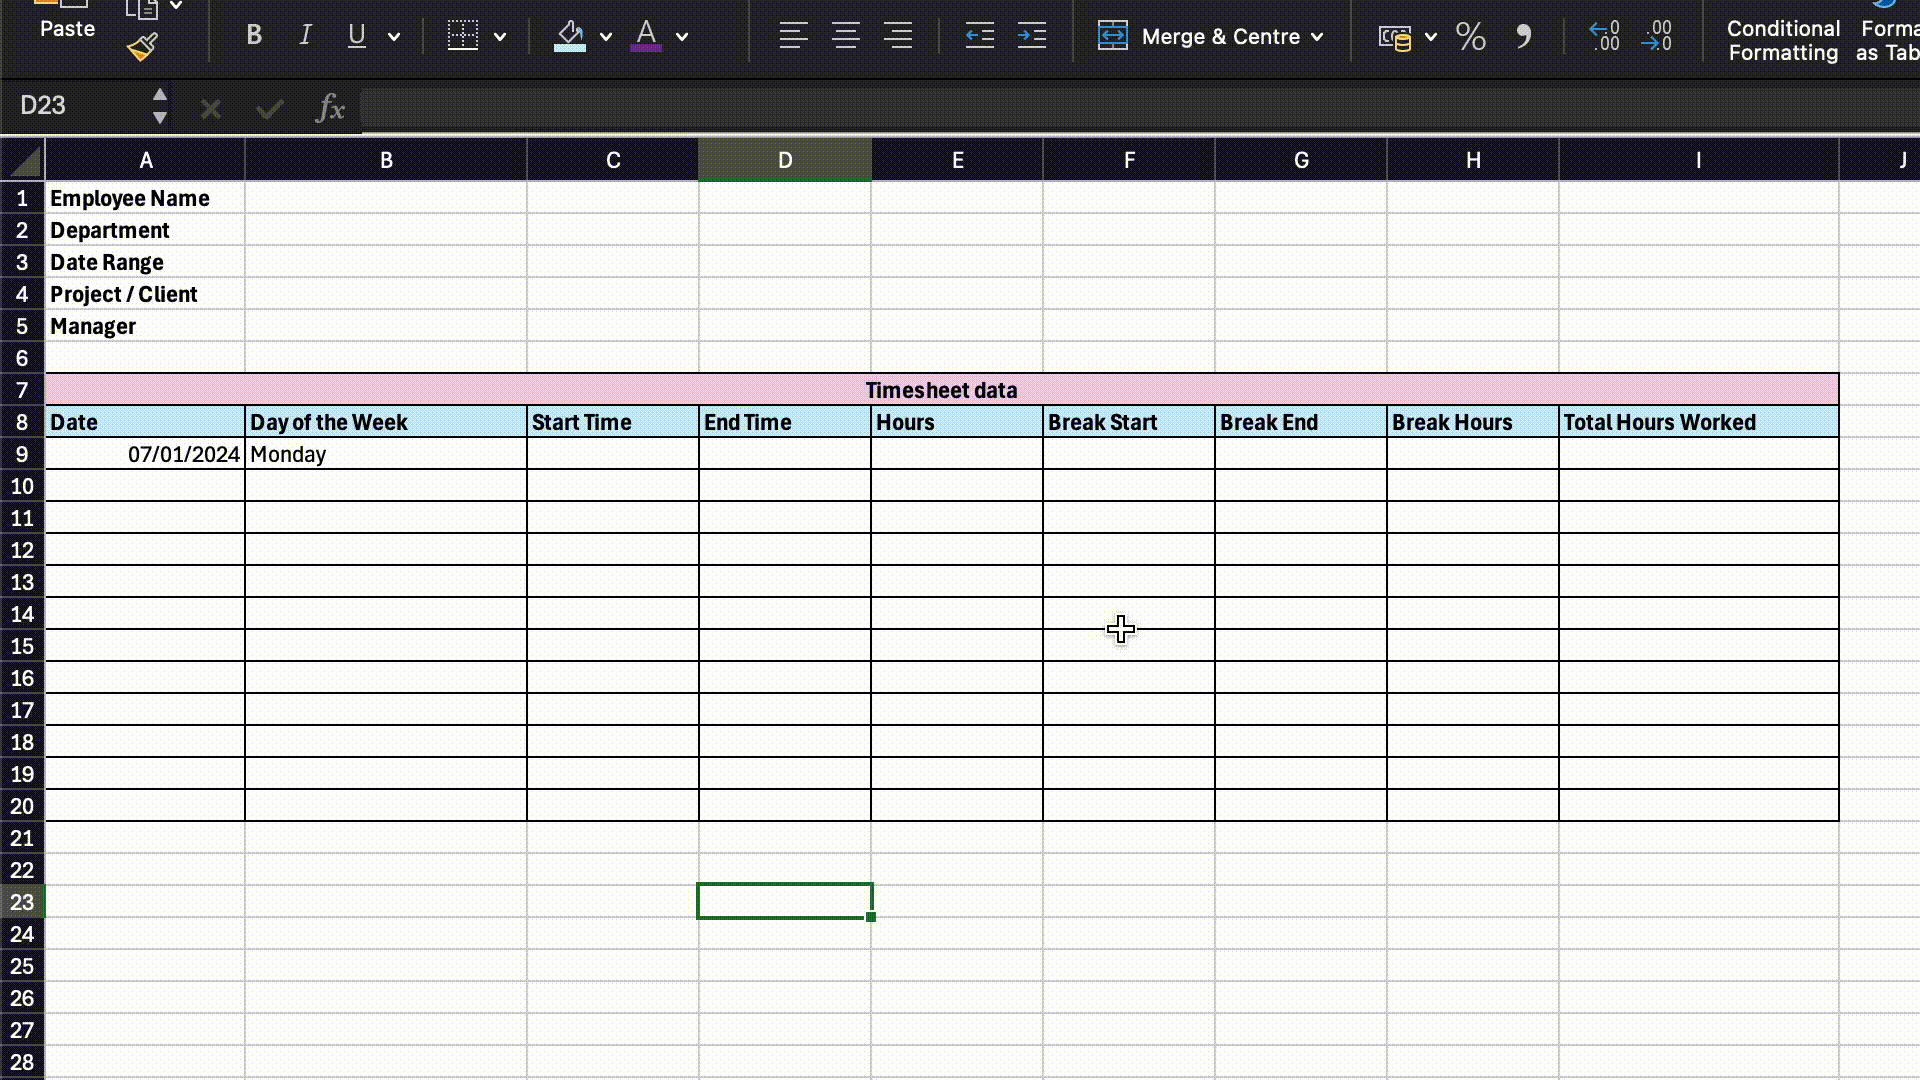
- Create a new workbook: Open Microsoft Excel and select “New Workbook.” Add labels for basic information such as employee details, project name, and manager.
- Add timesheet labels: Include labels for date and day of the week, start and end times, rest breaks, and total hours worked.
- Format your timesheet: Use headings, colors, borders, and merge cells to make your timesheet easier to read.
- Use formulas for automatic calculations: Implement basic formulas like SUM for total hours and more advanced tools such as conditional formatting for tracking data such as overtime, lateness, etc.
- Save and export: Save your timesheet and export it for client billing, payroll processing, and more.
Let’s explore each of these steps in more detail.
Step 1: Create a new workbook
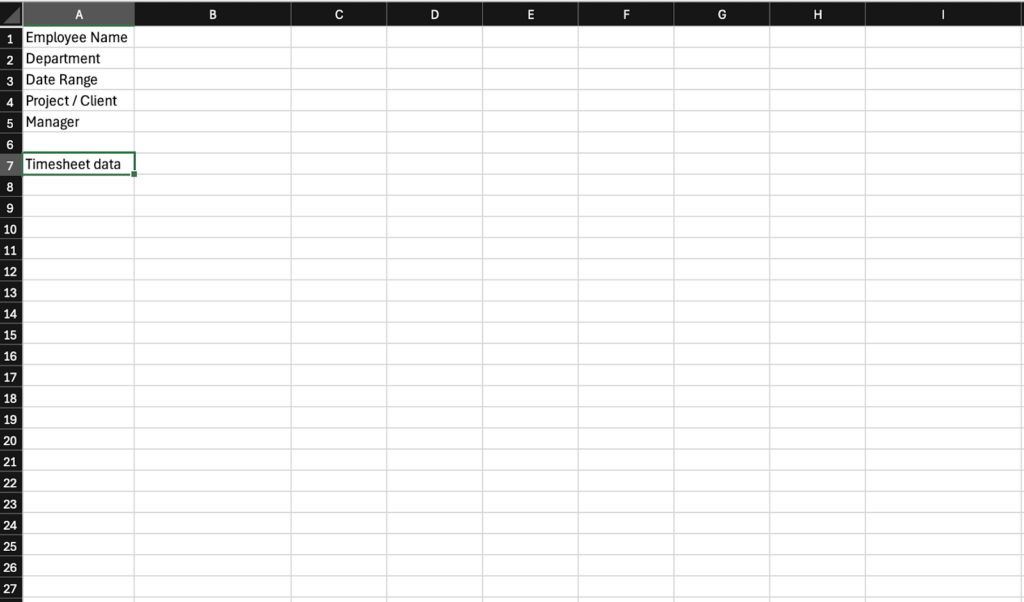
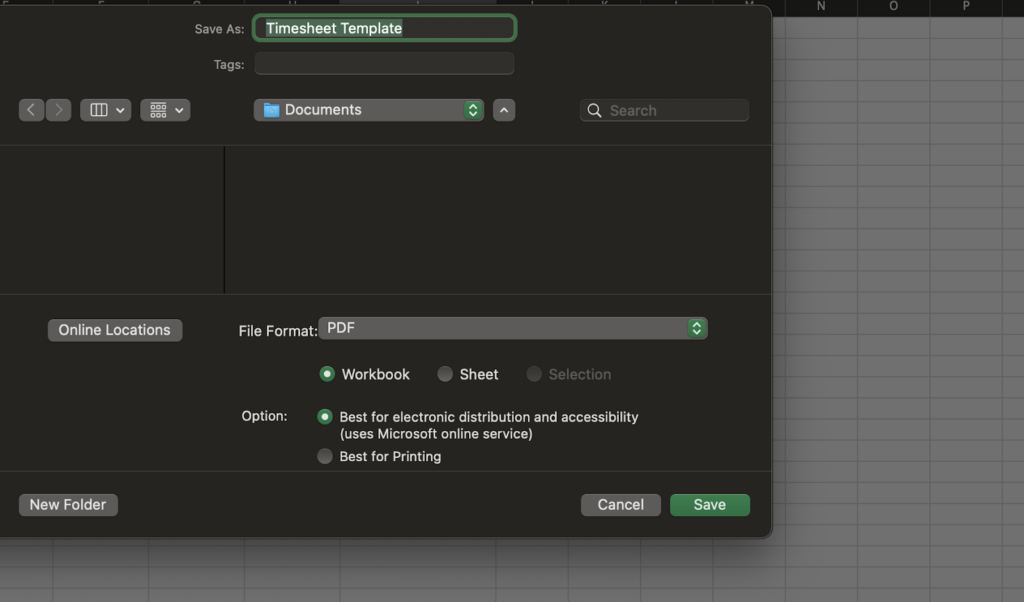
Open a new workbook in Excel and click “Save As” to name your spreadsheet with the right title—for instance, “Timesheet Template.”
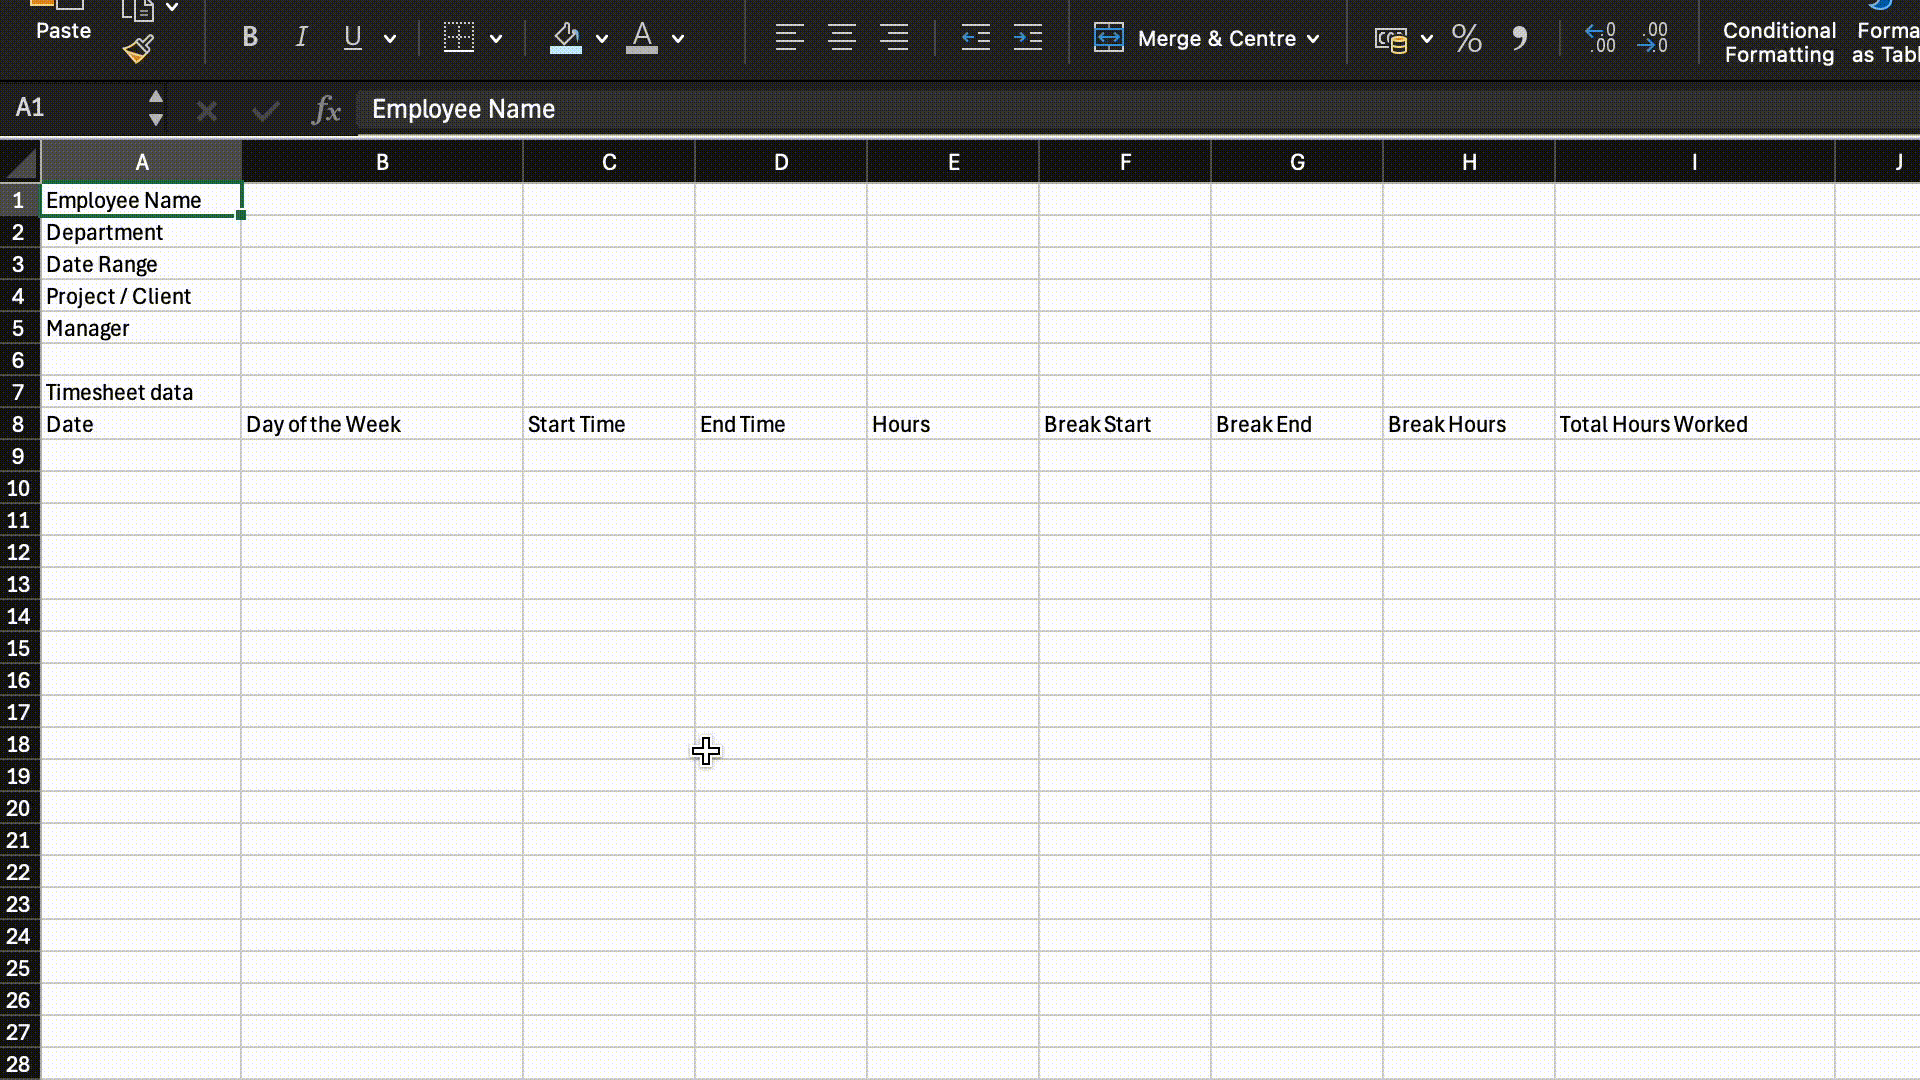
In column A, add basic labels such as:
- Employee Name: Refers to the specific employee whose timesheet this is
- Department: Describes which team or department they’re a part of
- Date Range: Specifies the time span for the timesheet
- Project / Client: Tells you which project or customer the timesheet relates to
- Manager: Identifies the manager responsible for reviewing and approving the timesheet
Leave space for employees to fill in this information in the space directly adjacent to these cells. For example, if you have the label Employee Name in cell A1, the worker will type their name into cell B1 when filling out their timesheet.
This basic information correctly attributes the timesheet to the right employee, project, and timeframe, making it trackable and easy to review for payroll.
Step 2: Add timesheet labels
Now that you’ve added the basic labels, it’s time to add timesheet-specific labels.
Leave an empty row after your basic information and title the next row “Timesheet data” to differentiate the main timesheet from employee and project details.
For example, if your basic information finishes in row 5, leave row 6 blank and label row 7 as “Timesheet data.”
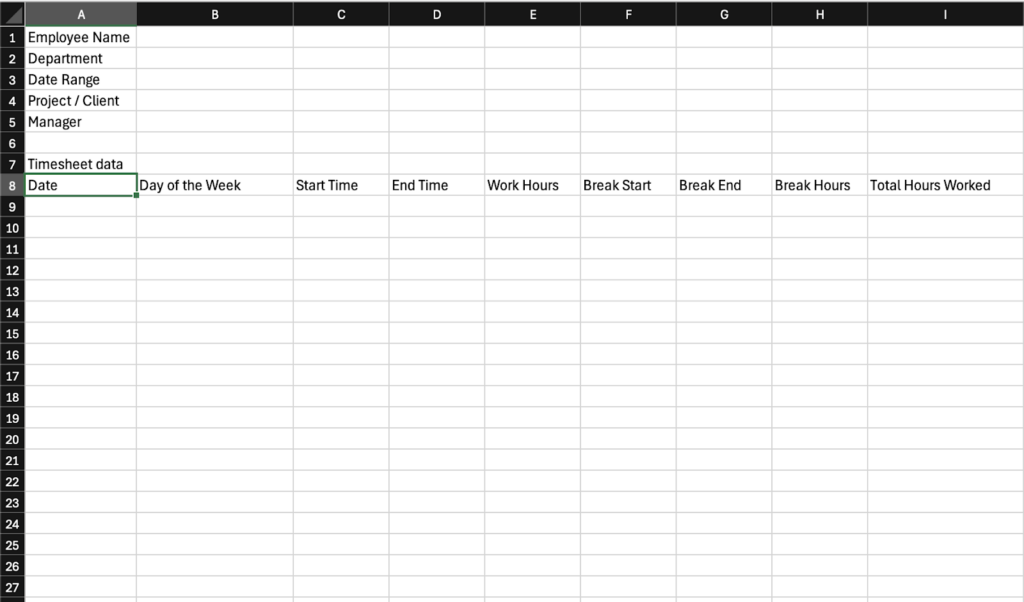
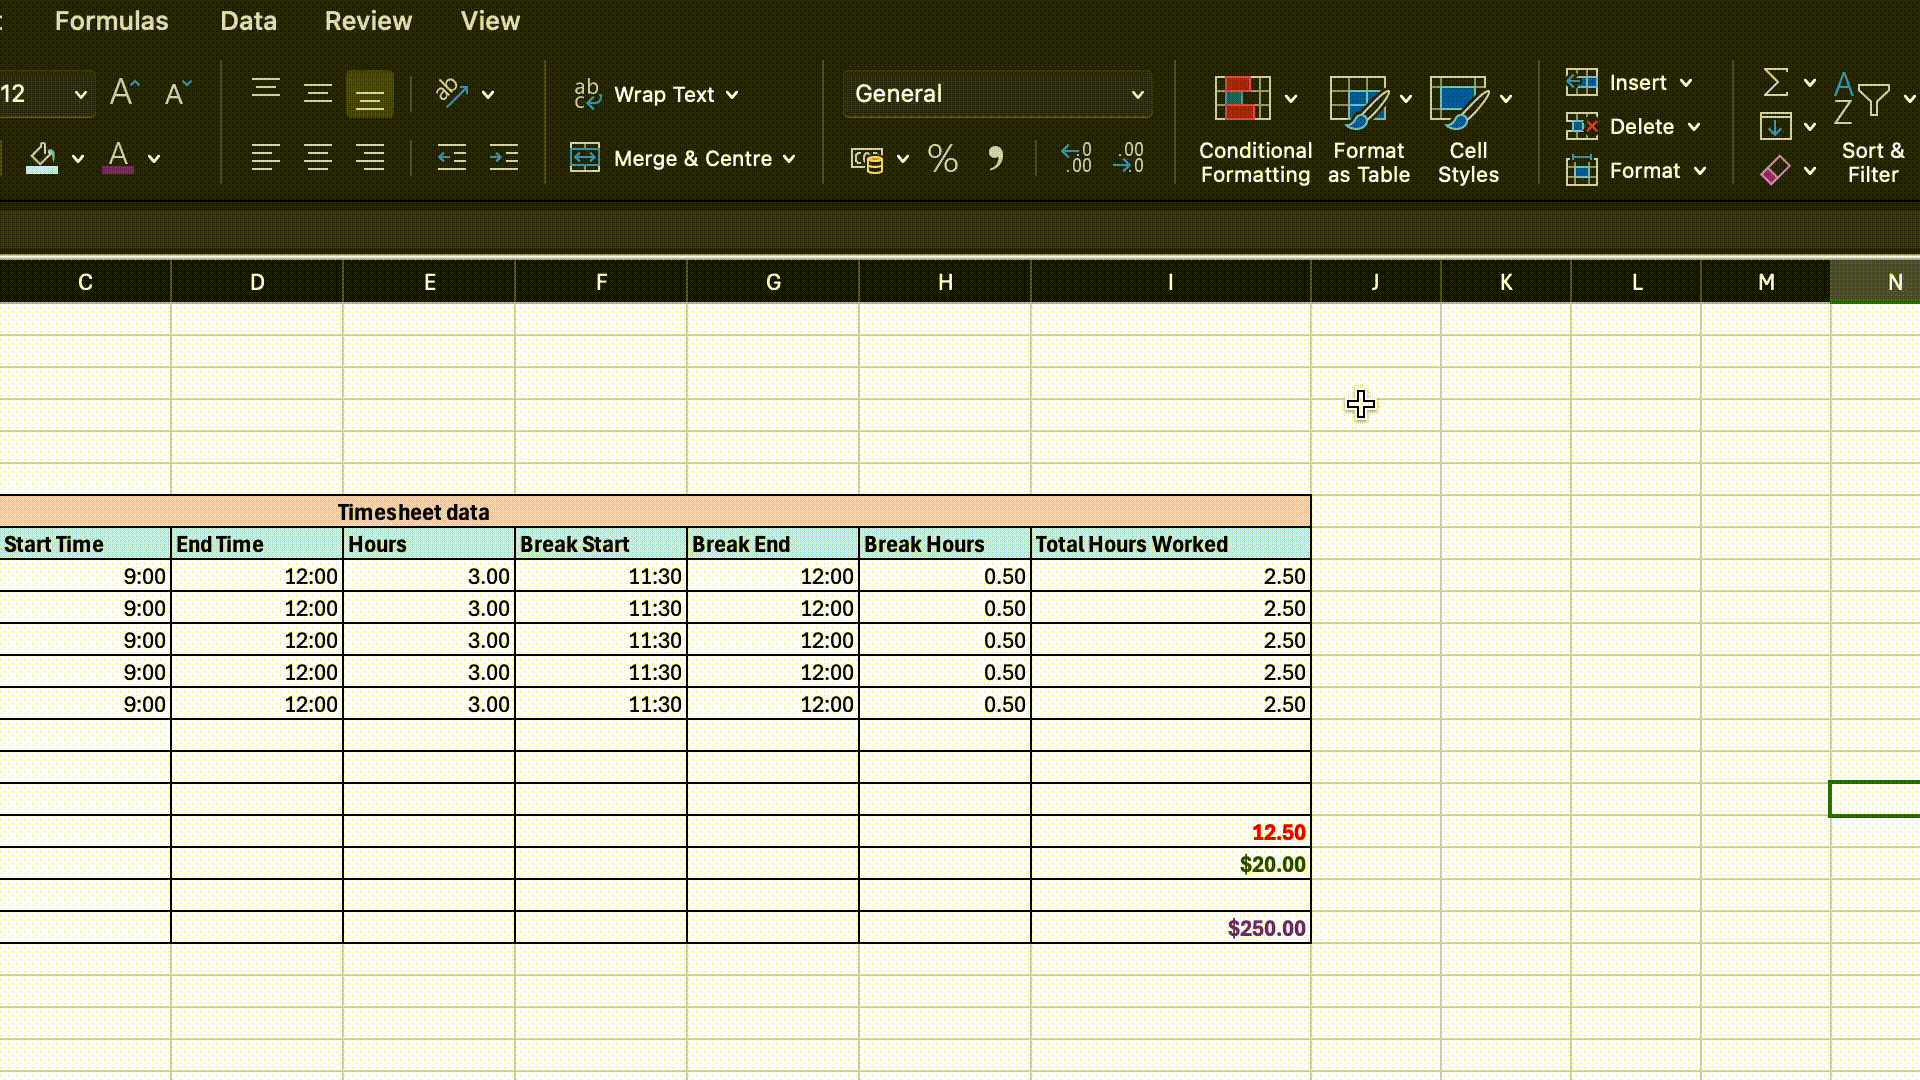
In the next row, start adding timesheet labels for each column. Using the example above, your timesheet labels will begin in row 8. Add the following timesheet labels to cells A8, B8, C8, and so on.
- Date: The date the time entries correspond to
- Day of the week: The day of the week for that date—e.g., Monday, Tuesday, etc.
- Start Time: The time an employee clocks in
- End Time: The time an employee clocks out
- Work Hours: The hours spent between the employee’s start and end times
- Break Start: The time an employee starts a break, such as rest times or lunch breaks
- Break End: The time an employee ends their break
- Break Hours: The hours spent during the employee’s break
- Total Hours Worked: The actual time spent working (Work hours – Break hours)
Pro Tip
If your employees work on multiple tasks, projects, or clients at the same time, it may be better to use a timesheets app (such as Connecteam) that links time entries to each task or project. This lets you track how workers are spending their time across activities.
Step 3: Format your timesheet
Formatting your timesheet isn’t just about making it look pretty. It helps to keep your data organized and clean. Plus, it’s crucial for making your formulas work. Consider formatting your spreadsheet in 2 ways.
Visually
Select your entire sheet and choose a big and readable font size for the data—for instance, a sans serif font like Arial in size 12 or 14.
Next, format all your labels in bold by selecting the relevant cells and clicking on the “B” symbol for bold from the top bar. This makes it easy to differentiate between labels—for example, Employee Name or Start Time—and data such as John Doe or 09:00. You can also fill colors to separate labels from data.
For table headers such as “Timesheet data,” select the cell that has the title typed in, drag it to the last column of the table, and click “Merge Center” from the top bar to make it a header for the table.
Finally, select all your timesheet cells, right-click, and choose “Format Cells.” Now, add borders to outline tables and cells, visually separating them for a cleaner look.
Cell-wise
Additionally, you can format cells based on the type of data in the cell. Select all the cells in the date column, click the “Format Cells” drop-down from the top bar, and choose “Date.”
Similarly, select all time-related columns, including start and end times and break times, and format these as “Time.”
This way, when employees add their entries, the data will be captured in the right format for that cell. For instance, all date-based cells can be in the same MM/DD/YY to avoid errors and inconsistencies.
Next, format your “Work Hours,” “Break Hours,” and “Total Hours Worked” cells as “Number,” as you’ll later use these for calculations.

Now, your spreadsheet is correctly formatted and ready for Excel timesheet formulas.
Step 4: Use formulas for automatic calculations
Excel timesheet formulas can help to automate all your calculations. There are a few different formulas that feed into any timesheet calculator.
How to create an Excel formula for hours worked
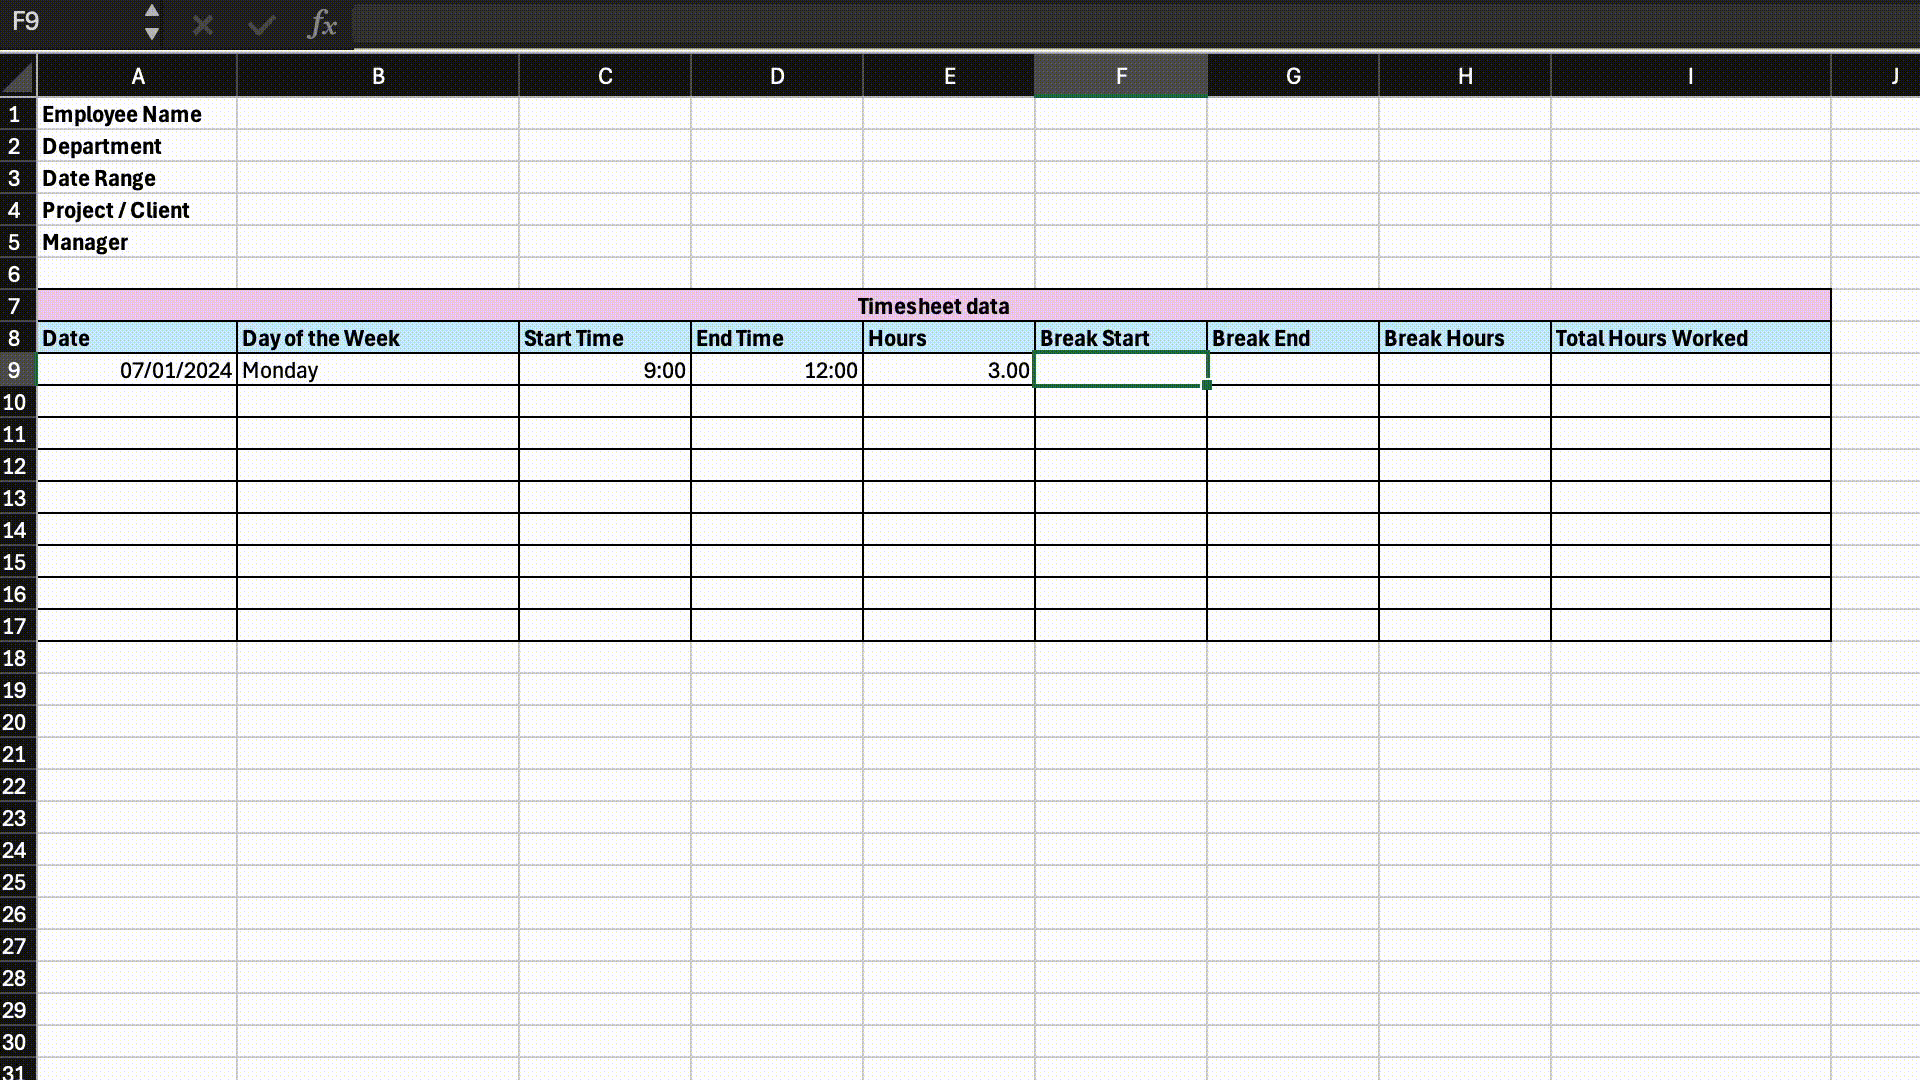
To calculate hours worked in Excel, first add the start and end times to the relevant cells—for example, C9 and D9, respectively.
Then, subtract the start time from the end time using a simple formula: =(D9-C9)*24. Make sure the cells are formatted correctly to display the result in number format.
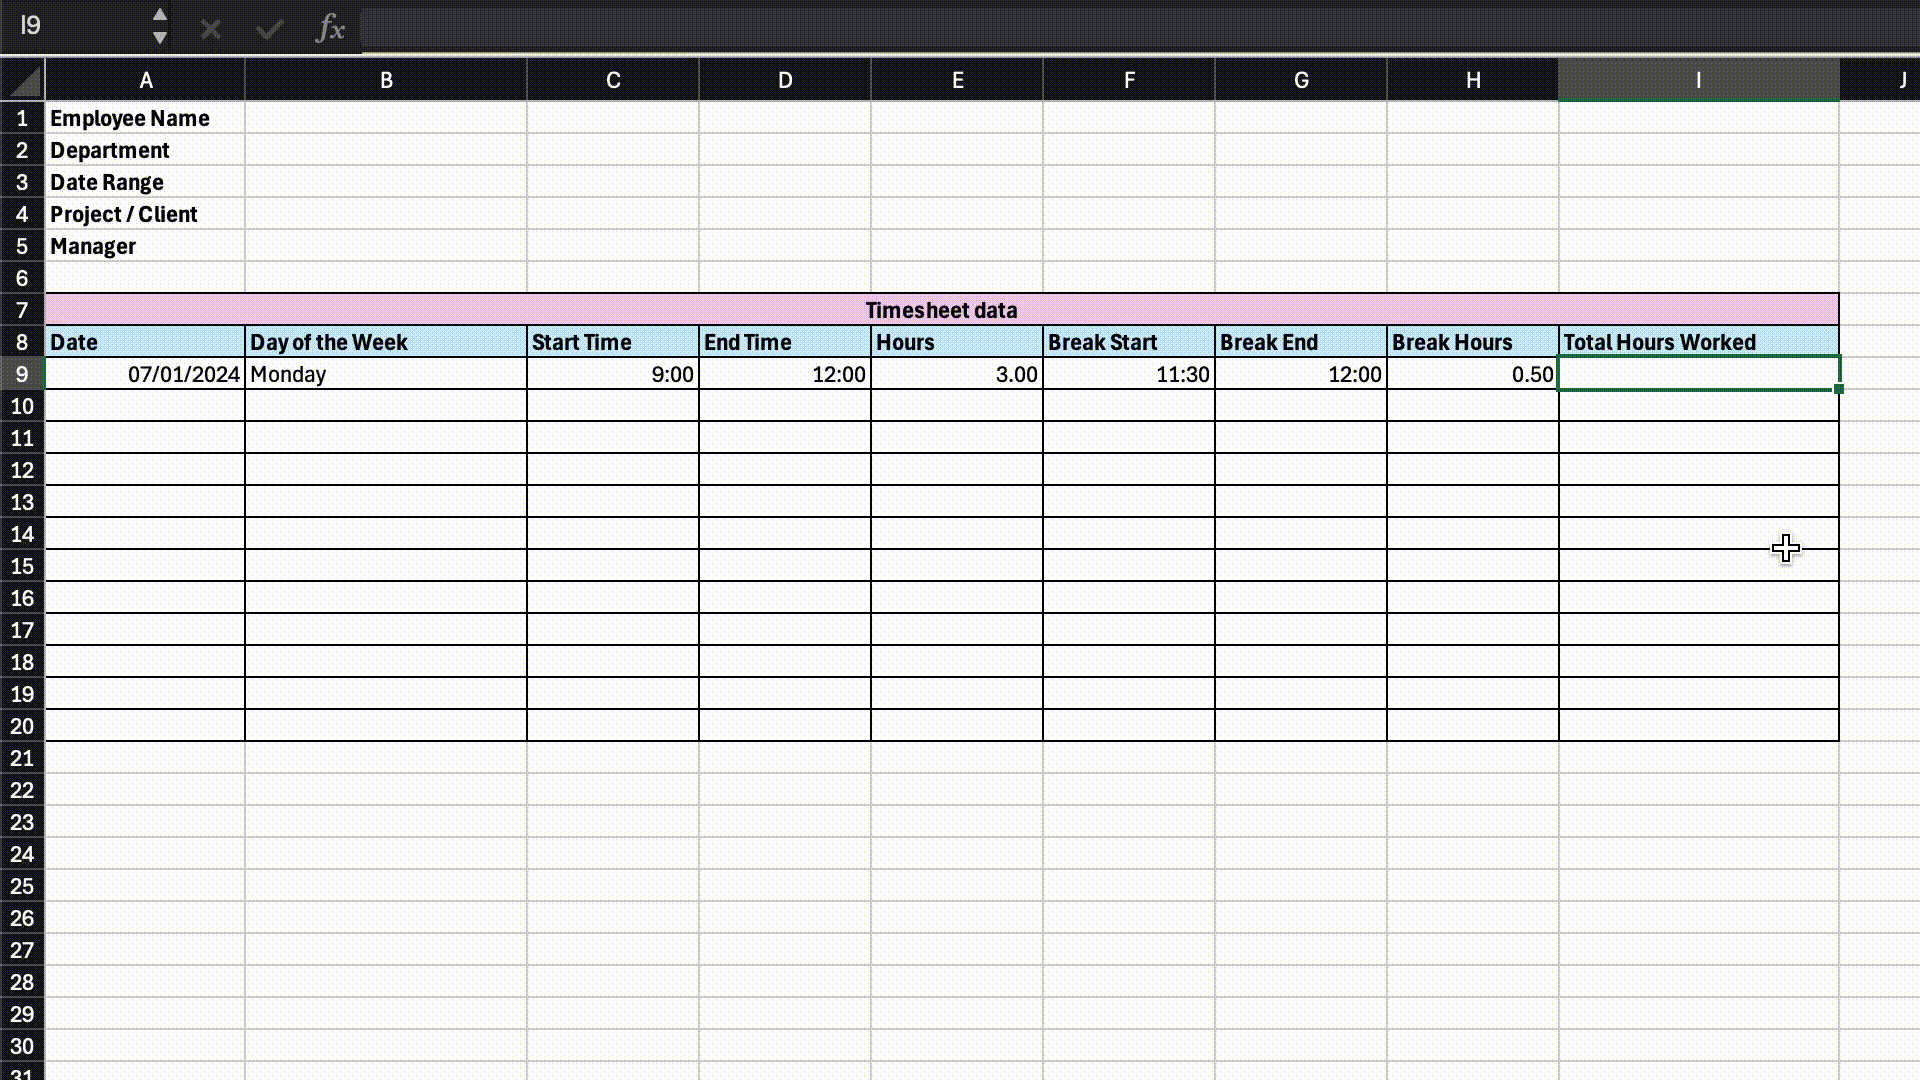
How to calculate break hours
Once break start and end times have been manually entered, you can calculate break hours by subtracting the break’s start time from its end time and multiplying it by 24 to get the break hours in a 24-hour period (use this formula: “=(G9-F9)*24”). Again, make sure you’ve already formatted your “Break Hours” cells as “Number” so the calculation will work.
How to calculate total hours and minutes in Excel
Subtract work hours from break hours to get the total hours worked each day.
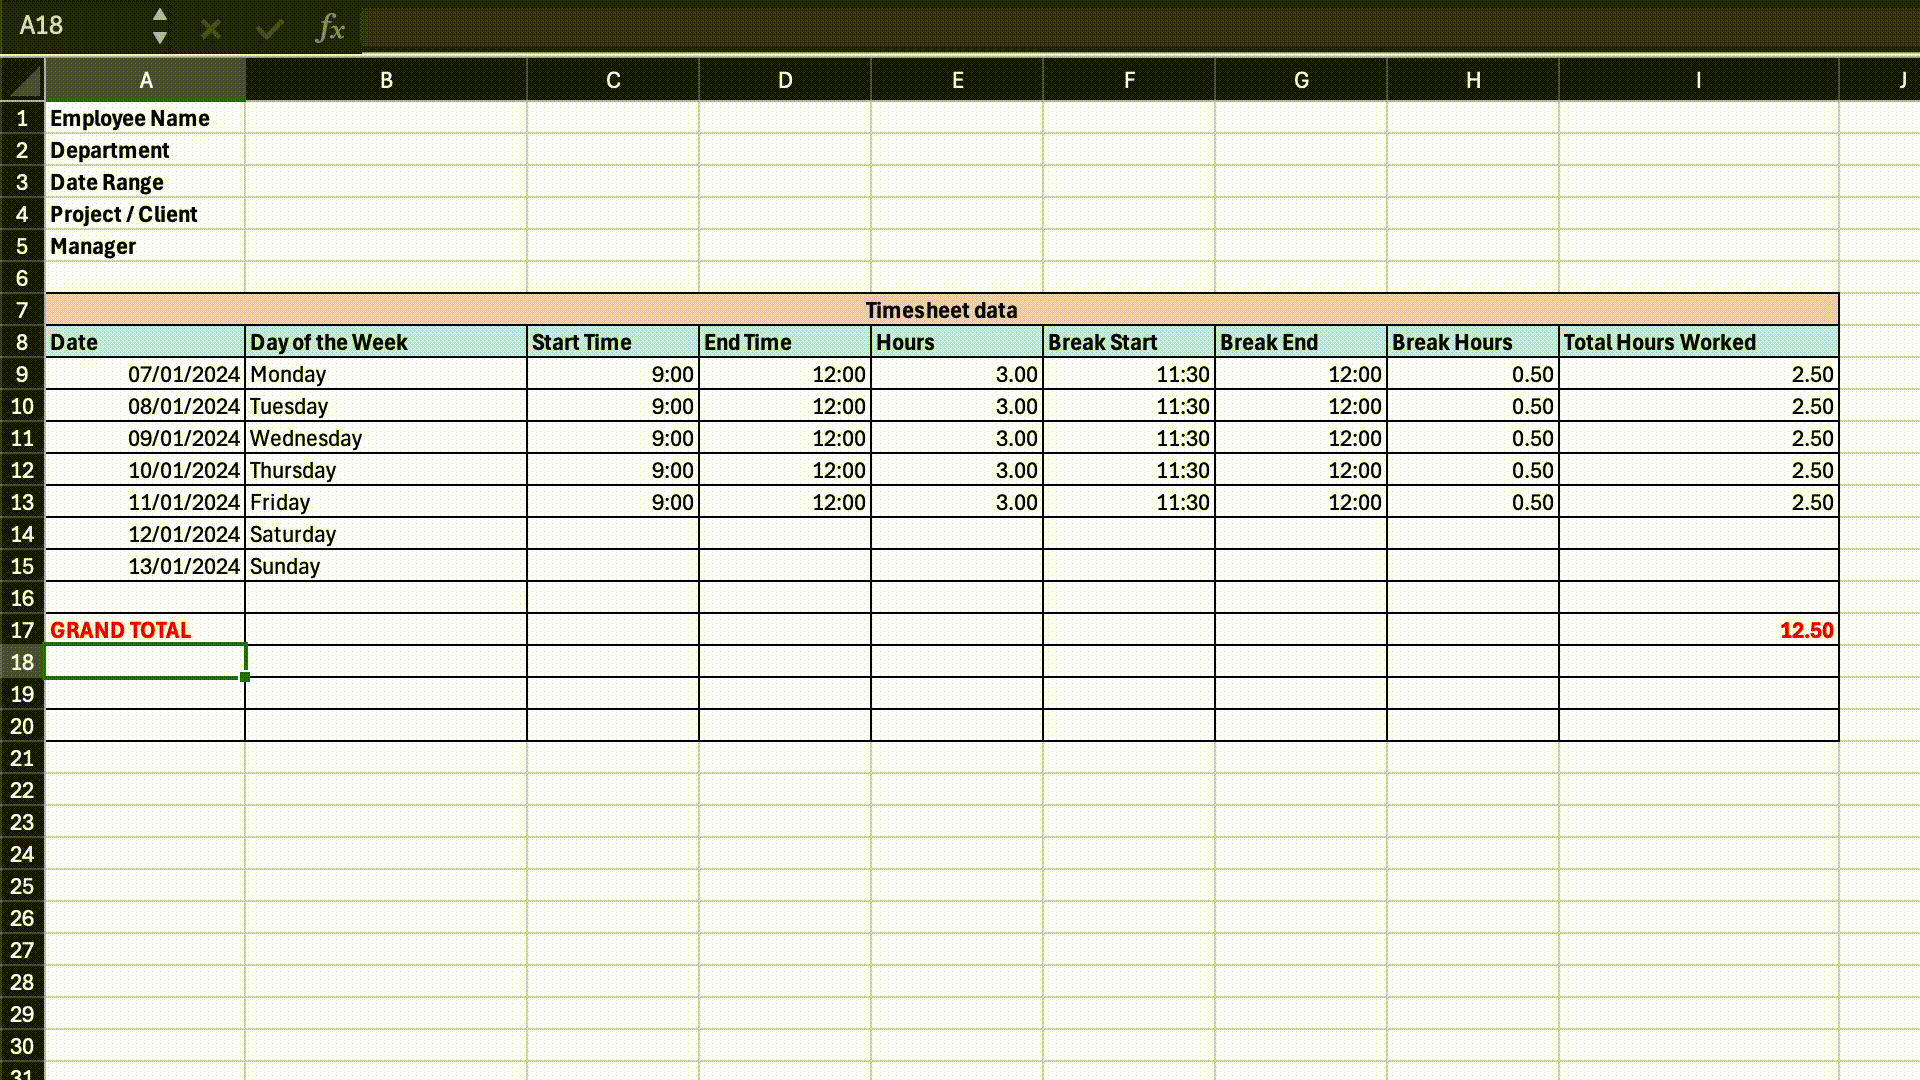
For instance, if someone works eight hours every day from 09:00 to 12:00 and takes a 30-minute lunch break from 11:30 to 12:00, their total hours each day = 3 – 0.5, which is 2.5 hours.
You can then use the SUM function to add the total hours for each day for the grand total hours worked for the specific time period—weekly or monthly, for example.
Pro Tip
If you add the employee’s pay rate to your timesheet, you can calculate their pay using the formula Employee Pay = Grand Total Hours Worked × Hourly Rate. This is a great way to monitor labor costs and review payroll amounts.
Step 5: Save and export
Once timesheets are ready and approved, you can export them as CSVs, PDFs, or other formats by clicking on “File” followed by “Save As.”
Then, choose your desired file name—for example, “Timesheet 1”—and preferred format.
Your file is now ready for payroll, project analysis, client invoice calculations, etc.
Tips and Tricks to Maximize Accuracy and Protect Your Timesheet
Here are some of our top tips to improve timesheet accuracy, keep data protected, and stay compliant.
Provide detailed guidance to employees
Give your employees clear instructions on how to complete their timesheets correctly, including what information goes in which field and in what format—for instance, dates in MM/DD/YY format and time in 24-hour format.
Remember that not everyone is familiar with Excel timesheet formulas. While it’s unlikely employees will have to create formulas themselves, adding information in the wrong cells or formats can lead to mistakes.
Lock your timesheet
Next, lock your timesheet. This means setting up protections so that certain cells can’t be accidentally changed, especially after you’ve approved them for payroll. Here’s how to do it:
- Select the cells you want to lock.
- Open “Format Cells,” then go to the “Protection” tab.
- Check the “Locked” box.
- Next, go to the “Review” tab, click “Protect Sheet,” set a password, and ensure the option to select locked cells is unchecked.
- Save changes, click “OK,” and save your workbook. Now, only the unlocked cells can be edited.
Use conditional formatting
Conditional formatting is a game-changer for those who know how to use it. You can use this tool to automatically highlight instances of lateness, overtime, excessive breaks, and more on your timesheets.
Here’s an example of how you can set up conditional formatting for overtime:
- Select the cells you want to apply conditional formatting to.
- Go to the “Home” tab and click “Conditional Formatting.”
- Choose a rule type, such as “Highlight Cells Rules.”
- To highlight overtime, choose “Greater Than” and enter your threshold, e.g., 8 hours. Pick a color to highlight these cells
- Click “OK” to apply the rule and save your workbook.
Pro Tip
Not sure what else you can use conditional formatting for? Ask an AI tool like ChatGPT for some inspiration.
Free Excel Timesheet Template
Remember to customize this for your own needs and double-check the formats and formulas you learned about in this guide before rolling it out.
Problems With Using Excel for Timesheets
Despite its popularity, creating timesheets in Excel poses several risks and problems.
Manual and time-consuming
Employees must manually log each time entry, including start and end times, break times, and more, which can be long and effortful.
Moreover, you’ll need to review every timesheet, double-checking and correcting mistakes. This is a tedious process that can take up a lot of time you could have spent elsewhere.
Difficult to verify
When employees record their own time in Excel, there’s no easy way for you to check that they actually worked these hours. This leaves your business susceptible to time theft.
Did You Know?
Connecteam offers a GPS tracking app that shows you exactly when and where employees spend their work hours.
Challenging to scale
Managing timesheets for a few employees is doable, but for dozens or hundreds, it can quickly get overwhelming. Imagine having to maintain so many individual timesheets. You’ll likely lose track of files, misplace records, or use older versions.
Prone to human errors
Manual data entry is prone to mistakes, and despite your best attempts to review timesheets, there’s room for slip-ups. A simple typo or miscalculation can lead to significant errors in payroll or project tracking. For example, entering “06:00” instead of “18:00” drastically changes the total hours worked and causes headaches down the line.
Only offers one piece of the puzzle
Excel lets you input time entries manually, but it’s not the easiest way to track employees’ hours live. Further, it doesn’t provide additional tools such as project tracking, task management, or payroll. You’ll have to use multiple systems to run these processes, which can get complex and expensive.
This Might Interest You
In addition to time tracking, some companies use Excel for job scheduling. Read our blog about why you should stop using Excel for employee scheduling.
Simplify Time Tracking and Timesheet Management With Connecteam
Excel is a widely used timesheet tool, but it’s time-consuming, effortful, and prone to mistakes. Luckily, you can avoid these problems with the right time-tracking software.
Connecteam, for instance, is an all-in-one solution that offers a full range of timekeeping features at a very affordable price.

Employees can clock in and out of their shifts with a single click from any device to track their work time, breaks, and overtime hours in real-time.
Connecteam automatically creates digital timesheets that you can review, edit, and approve from anywhere before syncing them with payroll for seamless employee payments.
Connecteam also offers task and project tracking, HR management, and countless other tools so you can manage all aspects of your business from a single platform.
Try Connecteam for free today.
FAQs
How do you record time in Excel?
Use the NOW() function to start recording time live. Type =NOW() in your Start Time cell when you start and again in your End Time cell when you stop. Subtract the start time from the end time to get the duration.
Can Excel calculate hours and minutes?
Yes, Excel can be used to calculate time spent on tasks in hours and minutes. Use =TEXT(B1-A1,”h:mm”), where B1 is the end time, and A1 is the start time. This will give you the difference between the times in hours and minutes.
How do you use Excel for payroll?
Use the formula Total Pay = Total Hours Worked × Hourly Pay Rate to determine each employee’s total pay. Then, lock your timesheet, save it as a CSV, and import it into your payroll software.