


Learn how to make a work schedule in Excel in a few easy steps.
Creating a work schedule in Microsoft Excel is a great way to quickly visualize the week ahead or build a custom schedule for your employees. However, it’s important to ensure your Excel schedule is laid out clearly. Otherwise, you and your employees could miss shifts or meetings.
In this guide, we’ll explain how to make a work schedule in Excel and share a free template you can use to get started.
Key Takeaways
- To make a work schedule in Excel, download our free Excel template, adjust the dates, and then add your shifts to create an Excel work schedule in minutes. You can customize your schedule with color-coding, cell borders, and more.
- Excel schedules can work well for small teams, but they lack the flexibility that larger businesses need.
- Dedicated team scheduling software like Connecteam helps you build advanced schedules, maintain compliance, and reduce no-shows.
Connecteam: The Better Work Schedule Alternative to Excel
While Excel works for basic scheduling, it becomes messy pretty quickly as your team and shift complexity grow. Scheduling software like Connecteam eliminates these headaches with powerful automation and built-in communication tools.
With Connecteam, you can create complex schedules in minutes, use the AI scheduler to assign shifts based on availability, qualifications, and preferences, and ensure fair distribution to cut overtime costs.
Automatic shift validation flags conflicts, compliance issues, and missing qualifications before they cause problems. Employees get instant notifications, can swap shifts with manager approval, and access all shift details (documents, checklists, and instructions) right from their mobile devices. That means no more screenshotting complicated spreadsheets and hoping that everyone sees their assigned shifts.
Before you learn how to make a work schedule in Excel, consider trying the easier alternative: Try Connecteam for free today.
Step 1: Create Your Template
We’ll focus on how to create a weekly Excel work schedule where each day is divided into shifts that don’t overlap. While more complex schedules are possible in Excel, these are much more challenging to create using this program.
There are 2 ways to start making a work schedule in Excel: you can use our pre-made template and customize it, or start from scratch and create your own template. We cover both approaches in detail so you can develop the perfect scheduling template to reuse from week to week.
This Might Interest You
Check out W3School’s introduction to Excel course if you’re completely new to spreadsheet software.
Use our Excel schedule template
The easiest way to create a work schedule in Excel is to download our free weekly schedule template. With our template, you can choose the week and hours you want to schedule, then dive straight into adding your shifts. You don’t have to manually add days and times, making the process much faster.
Open the template
To get started with our template, double-click on the downloaded file to open it. Depending on your version of Excel, it may open the template in Protected View, which doesn’t allow editing. If your template is in Protected View, click the Enable Editing button at the top of the spreadsheet to activate editing. (This button is usually located within a yellow banner.)
Pro Tip
The locations of various buttons and functions will vary depending on which version of Excel you’re using. If you’re having trouble finding something in Excel, refer to the Help section for specific instructions. You can also search for solutions in the Microsoft Support forums.
Choose date and time ranges
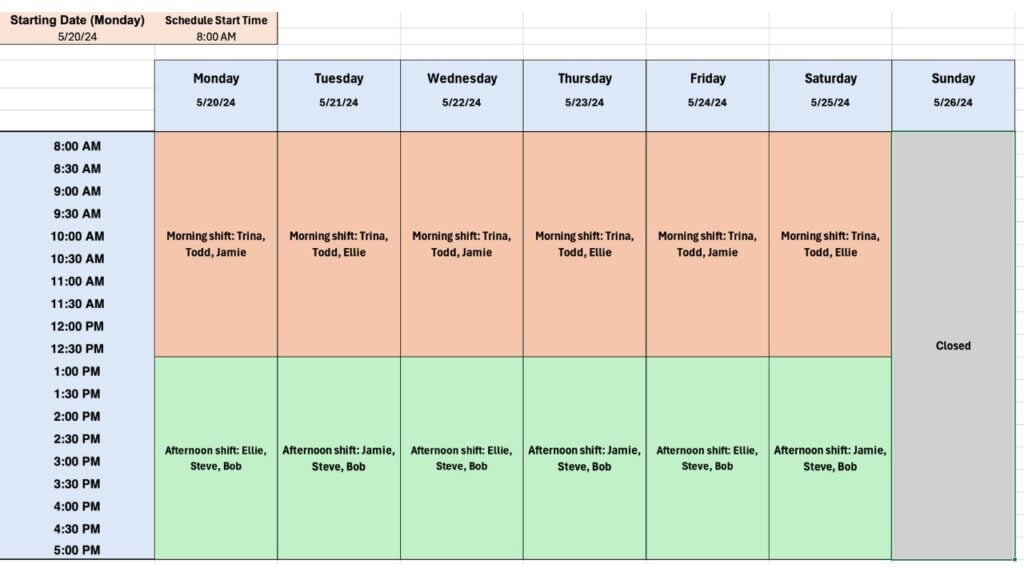
Our template lets you select the date range and starting time for your schedule. In cell A2, enter the date of the first day of the week you want to schedule. Our template uses Monday as the first day of the week, so you must enter a Monday date in this cell. (Failing to do this will result in scheduling errors.) In cell B2, enter the time you want your schedule to start. The template will update automatically.
Build your own scheduling spreadsheet
If you prefer to create your own scheduling spreadsheet instead of using our template, you can set up a custom schedule following these steps.
Add week and starting time
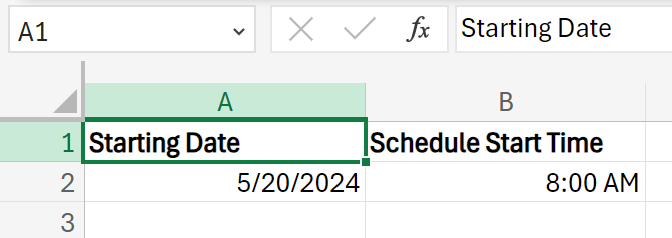
The first step to making a schedule in Excel from a blank spreadsheet is to set the date and time ranges for your schedule. Select cell A1 and enter Starting Date. In cell B1, enter Schedule Start Time.
In cell A2, enter the date that your week will begin using the format MM/DD/YYYY. You can decide whether your week should begin on a Sunday, Monday, or a different day.
In cell B2, enter the time you want your schedule to start at—for example, 8:00 AM.
Prepare your schedule’s frame
Next, you can add the days of the week and time intervals to your schedule.
Add the days of the week starting in cell B4 and extending horizontally to cell H4. Make sure that you start with the same day of the week that you chose in Step 1 (i.e., if your week starts on Monday, enter Monday in cell B4).
In cell B5, enter =A2 to add the date you inputted into cell A2. Enter =B5+1 in cell C5, then extend the formula to the right to add the date to each day of the week. You can do this by clicking on the square in the bottom-right corner of cell C5 and dragging your mouse over to cell H5.
In cell A6, enter =B2 to add the starting time of your schedule. Then enter =A6+Time(0,30,0) in cell A7 and extend the formula down to the last time you want to include in your schedule. This creates a list of 30-minute time intervals down the left side of your schedule.
You can modify the “30” in this formula to schedule it in 15 or 60-minute increments. Shorter or longer increments are also possible as long as they are entered in minutes (for example, to enter 2 hours, you must enter “120” minutes).
Step 2: Add Your Shifts
Now you’re ready to add shifts to either our template or your own custom scheduling spreadsheet.
If you’ve created your own custom scheduling spreadsheet, the best way to do this is to write out an easy-to-read description of your shift in the cell corresponding to its day and start time.
For example, say you want to schedule employees to shifts, and your first shift starts at 8:00 am on Monday. In the corresponding cell, enter a description like “Shift: John Doe” or “Morning shift: Trina, Todd, Jamie.” You can add more detailed information to shift descriptions, such as the location or information employees need to know.
Then select all the cells from the shift’s start time to its end time. In the ribbon above your spreadsheet, click Merge, then select Merge and Center to create one large cell that spans the shift’s entire duration. Click the Align icon (it looks like a stack of horizontal lines), then select Middle Align to move the text to the center of the cell.
Repeat this process for all shifts you want to add to your schedule.
If you need to unmerge cells, select the cell and click Merge, then Unmerge.
To use our template, you can use the shifts we’ve created or create your own. To create your own shifts, you’ll need to unmerge the cells so that you can follow the steps above for adding your own custom shifts.
Step 3: Customize Your Schedule’s Look
At this point, you have a functional schedule. However, a few customizations can make your schedule more visually appealing and ensure that you and your employees don’t miss shifts.
Highlighting your frame
A great place to start customizing your schedule is to highlight the days of the weeks and schedule times. Select the cells you want to highlight, then click on the paint bucket icon and choose a fill color. It’s a good idea to use the same color for the days of the week and times of day to create an easy-to-see frame for your schedule.
You can also increase the font size of the days of the week and times, use bold text, or even change the text color to ensure this key information stands out.
Color-coding shifts
It’s also a good idea to color-code shifts on your schedule according to the employee they’re assigned to or the shift type. That way, it’s easy for your employees to see when they must be at work.
You can color-code shifts manually using the fill color tool. Alternatively, you can use Excel’s conditional formatting rules to automatically color-code your shifts.
As an example, say you’re creating a shift schedule where you’ve assigned each shift to one employee—and want to assign a different color to each employee. Select all the shift cells in your schedule, then click Conditional Formatting. Select Highlight Cell Rules, then Text that Contains.
In the formatting box that appears, enter the name of one of your employees and assign them a color. To do this, click Format with, then Custom format. Then select Fill and select a color from the dropdown menu. When you’re finished, click Done. (The exact steps may vary depending on your version of Excel, so use additional support if necessary.)
Excel will automatically highlight all cells that contain that employee’s name the color you chose. You can repeat this process for all of your employees, assigning each one a unique color.
Please note that the above method won’t work if you’re assigning multiple employees to each shift. In that case, you might want to come up with a different color coding approach—for example, you might use a specific color for the morning shifts and another color for the afternoon shifts.
To use conditional formatting to color code these shifts, include the name of each shift (e.g., “morning shift”) within the shift. Then, enter this name in the formatting box that appears when you follow the above conditional formatting instructions.
Pro Tip
Don’t go overboard when color-coding shifts. Trying to use unique colors for different combinations of employee, shift type, and shift location can be confusing and cause employees to miss shifts.
Cell borders
Adding borders to your cells can also increase the visual clarity of your Excel schedule. Select all the shift cells of your schedule and click the Borders icon (it looks like a window pane), then All Borders. You can then further customize the look of your borders using the Border Color and Border Style options within the Borders menu.
Did You Know?
Excel has its own programming language, Visual Basic for Applications (VBA). You can use VBA to write macros, which automate scheduling tasks like flagging conflicts, calculating hours, or emailing shift reminders. While VBA can be helpful, it requires coding knowledge, and it can be time-consuming to build these automations from scratch.
Step 4: Save Your Schedule
When your schedule is finished, remember to save it as an Excel file (.XLSX) or CSV and share it with your employees.
When creating schedules for future weeks, you can open your current schedule and use it as a template. However, you should never overwrite schedules—keeping them is important for compliance with labor regulations, and they could be important if you face a labor dispute.
Save each new weekly schedule with a unique filename that includes your business name, what the schedule is for (e.g., a department or location), and the time period covered by the schedule. A good example is “My Restaurant – Kitchen – June 1-7.” You can keep all your saved schedules in the same folder on your computer so they’re easy to find.
Pro Tip
Make sure employees have a way to view your schedule on their mobile device. It may be helpful to share your schedule in multiple formats, including as a PDF or JPG.
It’s easy to use your personalized Excel schedule as a template for future weeks. Just highlight all the shift cells and click Merge, then Unmerge Cells. Now you can add new shifts to your schedule and stretch them to the appropriate duration.
Creating Schedules With Overlapping Shifts in Excel
Creating schedules with overlapping shifts is possible in Excel, but it’s complicated and time-consuming since it takes so much manual work.
Here’s one way to do it.
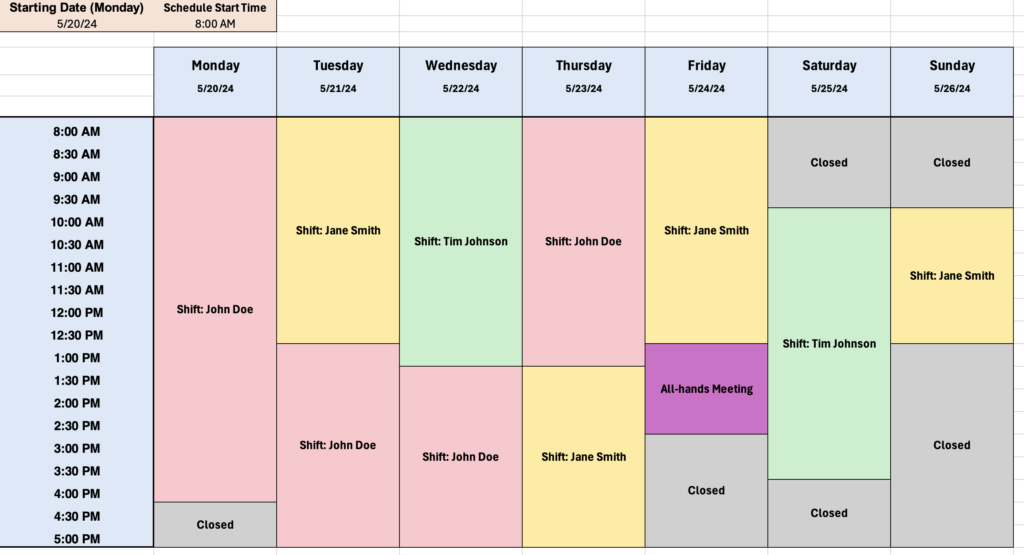
Instead of a weekly schedule, create a daily schedule by setting up time intervals representing the hours your business operates in the top row of your spreadsheet (e.g., 5:00 am, 6:00 am, etc.). (You can use a variation of the Time formula from Step 1 up above to do this quickly.)
Then, list your workers’ names in the leftmost column of your spreadsheet. Merge cells horizontally across the schedule to represent the duration of each employee’s shift, and use different colors to distinguish between various tasks and shifts for easy visualization.
Here’s what this can look like:
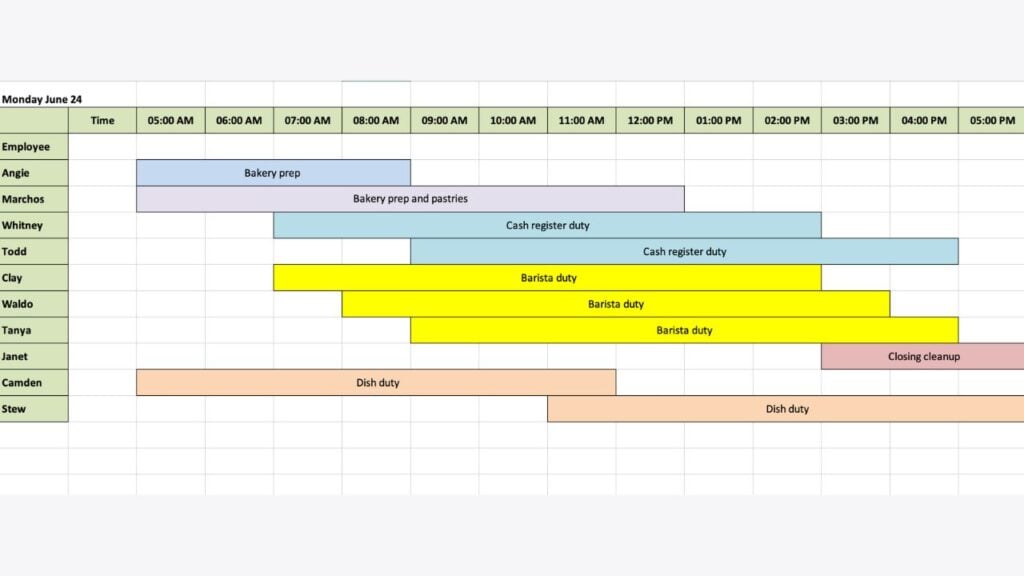
You’ll need to create a separate schedule for each day your business is open, so your employees will have to check each day’s schedule individually. This can make it difficult to keep track of shifts across the week and can lead to employees missing work.
Creating Schedules in Excel vs. Scheduling Software
Making a schedule in Excel can be a good solution for businesses with only a few employees to schedule or uncomplicated shift patterns. However, building schedules in Excel can quickly get complicated as your business grows. You must make sure everyone is scheduled to the right shift and keep track of employees’ time off—all while ensuring employees have the necessary qualifications for certain shifts.
That’s where dedicated scheduling software like Connecteam can come in handy. Connecteam makes it easy to build custom schedules of any complexity in minutes.
Let’s take a closer look at just how creating a schedule in Excel vs. using scheduling software like Connecteam stack up.
Building your work schedule
When building schedules in Excel, you must assign employees to shifts manually one at a time. It’s a time-consuming process that’s also prone to errors—you could accidentally assign team members to conflicting shifts or give a single employee many more hours than their colleagues.
It’s also difficult to build more complex work schedules in Excel. It can be very complicated to create a schedule with multiple employees working—particularly if they have overlapping shifts.
Schedule software is designed to make it easy to create complex schedules. For example, with Connecteam, you can assign multiple employees to a single shift or create overlapping shifts. Connecteam also automates schedule creation with an AI scheduling feature that automatically assigns employees to shifts based on their availability, work hour preferences, and qualifications.
Finally, Connecteam ensures shifts are distributed equally and works to minimize the amount your business has to spend on overtime. It’s a great way to save time and reduce scheduling errors.
This Might Interest You
Check out our in-depth comparison of the best work schedule maker apps to find the one that’s right for you.
Validating shifts
Dedicated scheduling software typically has automatic shift validation to ensure that your schedule is correct. For example, in Connecteam, you’ll get an automated notification if you assign an employee overtime or try to assign them to a shift that requires qualifications they don’t have. Connecteam can also flag potential compliance issues, such as forgetting to give an employee required break periods.
This kind of automatic validation isn’t possible in Excel unless you know how to code in Visual Basic.
Communicating with employees
Another limitation to Excel is that if employees have questions about their schedule or can’t take a shift, communicating about this is difficult. You can leave comments on shared Excel spreadsheets, but employees and managers may not see this in time to proactively solve problems.
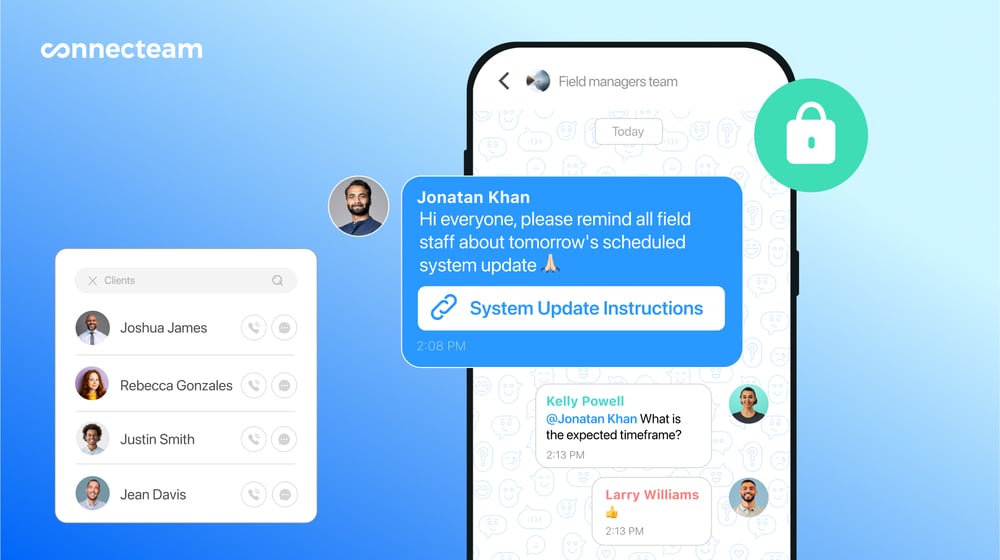
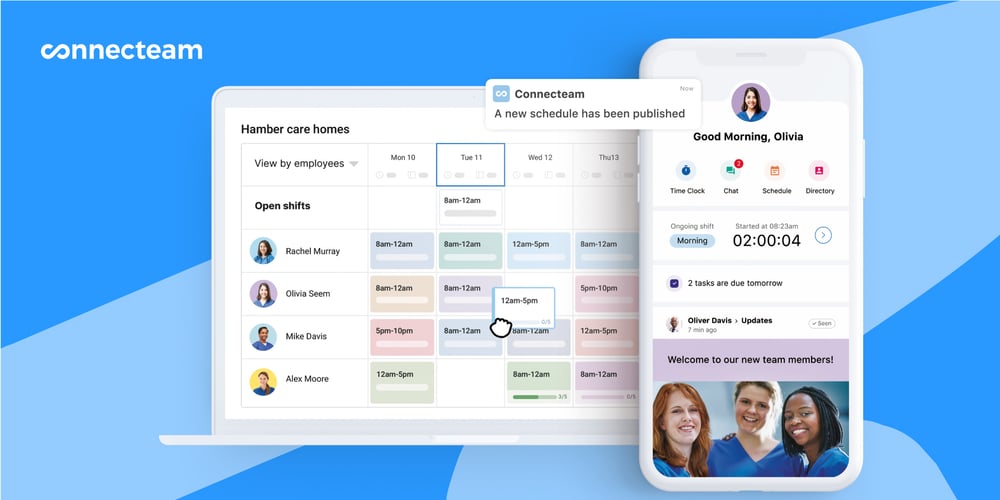
Not all scheduling software offers a way to communicate with employees, but Connecteam does. It automatically sends employees a notification when they’re assigned to a shift. Connecteam also includes integrated team instant messaging so that managers and employees can easily communicate about shifts. Group messages offer an easy way to find potential replacements for a shift or check in with employees ahead of a busy week.
Enabling shift swaps
Enabling employees to swap shifts is a great way to ensure all of your business’s tasks are covered while giving employees more flexibility to shape their schedules. Unfortunately, shift swapping isn’t possible in Excel—employees must agree to a swap and then contact their manager to make a change to the schedule.
With scheduling software like Connecteam, employees can organize a shift swap in the app and send the proposed change to their manager for approval. It’s very easy, and Connecteam’s shift validation rules ensure swaps don’t result in unnecessary overtime or compliance issues.
Adding information to shifts
Connecteam and other schedule platforms enable you to attach documents, forms, checklists, photos, and more to a shift. That ensures employees have the information they need to work effectively when they show up for a shift.
As employees complete tasks during a shift, your schedule will update in real time to show their progress. So, you get a live overview of how employees’ work is going.
In contrast, the only way to attach extra information to a shift in Excel is to use comments. This is very limited, as you can only include text or links. It’s also easy for employees to miss comments on cells that may contain important information.
Reducing no-shows
Once you create a work schedule in Excel, you can share it with employees—but that’s it. If you want to remind employees about an upcoming shift, you must do so manually. In addition, complex Excel schedules can be visually overloaded and confusing for employees to interpret, potentially leading to missed shifts.
Connecteam, on the other hand, can automatically send push notifications to an employee’s phone to remind them of an upcoming shift. This is a highly effective way to prevent disruptive no-shows.
This Might Interest You
Check out our in-depth comparison of the best work schedule maker apps to find the one that’s right for you.
Limitations of Excel for Complex Scheduling Needs
Excel can be a quick and inexpensive way to create a simple employee schedule, particularly for small teams with predictable shifts. But as soon as your schedule has more complex needs, like multiple locations, different roles, skill requirements, and employee availability, Excel can become unmanageable.
You’re forced to manually cross-check every detail, which takes up time and can cause errors.
And while Excel does offer advanced features like formulas, conditional formatting, and even VBA scripting, you need specialized skills to set up and maintain them. For most managers, that’s not practical. Especially when you can just use scheduling software that automates most of the process right out of the box.
This is where a dedicated tool like Connecteam transforms scheduling. Connecteam’s automation and validation tools handle the complexity for you, freeing up hours of admin time and reducing scheduling errors.
Even better, Connecteam offers a completely free Small Business Plan for up to 10 users. Paid plans are affordable, starting at just $29/month for up to 30 users, with Advanced at $49/month and Expert at $99/month, both also covering up to 30 users. When you choose Connecteam, you get the maximum value for your budget while saving valuable time.
Let’s take a closer look at how Excel stacks up against Connecteam:
| Feature | Excel | Connecteam |
| Ease of Building Complex Schedules | Manual entry for each shift; difficult to manage overlapping shifts, multiple locations, and roles | Create schedules for multiple sites, roles, and shift types in minutes; drag-and-drop interface; AI scheduler |
| Multiple Locations | Requires separate sheets or complicated layouts; no location-specific filtering | Built-in location management; filter and assign shifts by site instantly |
| Role & Skill Requirements | Must manually check qualifications; risk of errors | AI matches employees to shifts based on skills, certifications, and training records |
| Automation | None unless you write VBA scripts; very limited AI capabilities | AI scheduling automatically assigns shifts based on availability, preferences, qualifications, and compliance rules |
| Shift Validation | Manual cross-checking required; errors are easy to miss | Automatic validation flags overtime, compliance issues, missing qualifications, and scheduling conflicts |
| Communication | Limited to commentsEasy to overlook; no real-time updates | Integrated chat and push notifications; instant alerts for new shifts, changes, and reminders |
| Shift Swapping | Not supported; must be done manually through the manager | Employees can request swaps in-app; approval process ensures compliance and coverage |
| Attaching Information to Shifts | Only text or links via cell comments; not visible at-a-glance | Attach files, checklists, forms, and images directly to shifts; live updates during the shift |
| No-Show Prevention | No automatic reminders; high risk of no-shows | Automated push notifications and reminders significantly reduce no-shows |
| Scalability | Becomes complex and hard to manage as team size grows | Designed to handle teams of any size with minimal admin effort |
Create Your Work Schedule Today
Creating a work schedule in Excel is easy with our ready-to-use template. Just download our scheduling spreadsheet, add shifts, and assign employees to work. You can also improve your schedule with color-coding to make it easier for employees to see what shifts they’re assigned to.
While Excel can work well for scheduling small teams to simple shift patterns, it has very limited functionality compared to dedicated scheduling software like Connecteam. Connecteam helps you automatically schedule employees to work, maintain compliance, eliminate no-shows, and more.
Get started for free with Connecteam to see how it can help you create custom employee schedules in minutes.
FAQs
Should I use Excel to make a work schedule?
Small businesses may be able to use Excel to make simple work schedules, but it’s not a good solution for larger businesses. Excel doesn’t offer ways to remind employees about upcoming shifts or ensure that employees have the qualifications required for a shift. It also can’t alert you to scheduling conflicts or uneven shift distributions.
How do I create work shifts in Excel?
You can create work shifts in an Excel spreadsheet by first assigning a time to each row of a blank workbook (e.g., 9:00 am, 9:15 am, 9:30 am, and so on). Then select all cells from the start of the shift you want to its end—and click Merge and Center to combine them into a single cell that represents your shift.
Is free scheduling software better than Excel?
Free employee scheduling software like Connecteam can be much more effective for creating work schedules than Excel. Connecteam can automatically assign employees to shifts in a single click and will remind them about upcoming shifts. Connecteam also makes it easy to reduce overtime and add shift information (like checklists) that employees need to hit the ground running.
How can I integrate my Excel schedule with other business tools?
Integrate your Excel schedule with other business tools by using APIs, third-party connectors like Zapier, or importing/exporting CSV files into compatible platforms such as project management or payroll systems. These methods allow automatic data syncing and reduce manual updates.
What are the legal requirements for keeping employee schedule records?
Legal requirements for keeping employee schedule records vary by region but often mandate retaining them for 2–3 years. Compliance typically includes recording hours worked, overtime, breaks, and leave. Labor laws like the FLSA in the U.S. set minimum recordkeeping standards.
What are the limitations of using Excel for employee scheduling beyond a small team?
The limitations of using Excel for employee scheduling beyond a small team include lack of real-time updates, no automated conflict detection, and poor scalability. As team size grows, manual updates increase errors and time costs compared to specialized scheduling software like Connecteam.